

How To Fix Overexposed Photos In Lightroom
Introduction
Usage of Adobe Lightroom is i of the most cardinal and essential skill that all image editors and photographers should have, every bit well as master. This is mainly because getting the all-time exposure that you make it every shot is nigh an impossible thing to do and hence, we need help from external software similar Lightroom. In this article, nosotros are going to give yous a step-by-step guide that will help you respond your question on how to prepare an overexposed photo in Lightroom.
The steps are pretty easy if you get the hang of information technology and in fact, the showtime thing that we are going to talk about is your agreement on how the adjustment of exposure tools actually work and feel in Adobe Lightroom. If you want to fix photos that are overexposed in Lightroom, the kickoff affair that yous take to practise is slide the Highlight slider to the left.
Later on that, you lot accept to follow up with the White adjustment, while slowly pushing them to the negative values. Finally, the last pace yous demand to do is to use the Exposure slider and and so work on the exposure level. You should employ this slider depending on the desired level of the exposure that you want to see.
Learning about Exposure and Overexposure
One of the biggest and the virtually fundamental concepts when we talk about photography in general is exposure. If you get-go your photography journeying, one of the first basic things that we learn is the concept of exposure. In terms of photography, it is determined by the amount of light that the photographer mainly permits the sensors in the camera to receive.
In general term, it is basically how dark or brilliant the images in your photographs are. Whenever you are taking photos, you take the help of a lot of tools that will help you control the corporeality of light that is inserted into your camera's lens. Among them, aperture, ISO, and shutter speed are the near important. With the help of these tools, you will be able to change the lighting of the same scene differently every time you take them.
When the picture you take is too dark, so information technology is called "underexposed". On the other hand, when the photograph is also bright, we and so telephone call information technology "overexposed". When the photo has a brightness and contrast that is perfect, nosotros volition then telephone call it "properly exposed". Photographers all the time try to prepare their overexposed shots with the help of Lightroom.
Why does a photograph come out overexposed?
Almost all cameras can practice a skillful task when they are taking photos in a well-lit or balanced environment. Withal, it is seen that in a lot of cases, the subject that nosotros are trying to take photos of have uneven or not ideal lighting.
Usually, when the lighting in the environment is very complex, for example, during the sunrises or sunsets, we take a lot of areas where there are shadows and also actually brilliant areas, in the environment, the camera and its lighting meters can brand bad calculations and hence, this will result in a wrong exposure of the overall photo.
Near of the time, overexposed photos are seen when this meter of exposure thinks that the scene that we are trying to capture is darker, which results in a heave of exposure and hence, it makes the image expect as well vivid or lit. It is really common for all of u.s.a. to take overexposed photos. We shouldn't be embarrassed of them and instead, learn how to fix and make them properly exposed in postal service-processing, with the help of Lightroom.
How to Fix an Overexposed Photo in Adobe Lightroom
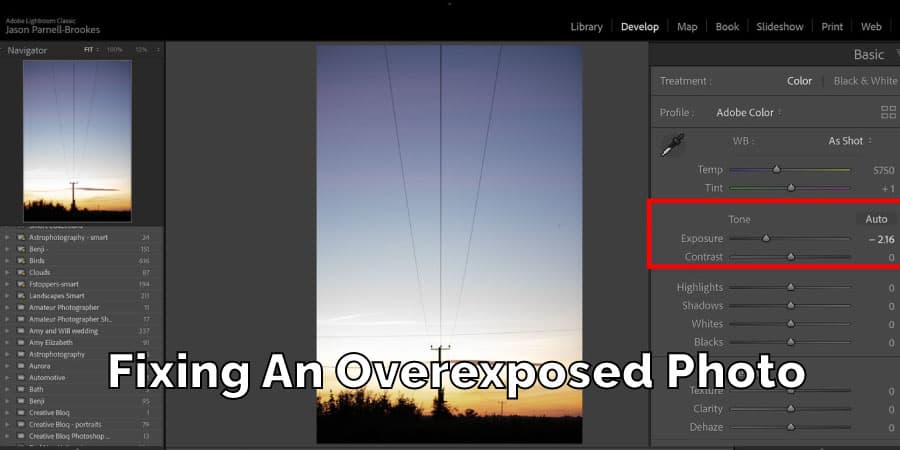
After you have imported your batch of photos, yous will ever come across that a few photos are overexposed or in general term, likewise vivid. You will be able to find out if an surface area inside a photo is overexposed or not through a tool called Histogram. To go at that place, you have to click the Develop Module and then click on the Histogram panel that you will detect on the summit-right corner of the software if you can't detect it by default after opening a photo.
Afterward that, press "J" on keyboard to start the Clipping Indicators. These Clipping Indicators mostly show the areas that are likewise brilliant or too dark in your photo. The places where it is too bright are highlighted in red, whereas the places where it is too night are highlighted in blue colour. In this article, we are working with overexposure only and hence, we will piece of work with the red colored highlights only.
The highlighted areas that are blood-red says that the parts of the image are diddled out. This too means that the parts are pure white and hence, they don't accept whatsoever information inside them. So, they cannot exist recovered or the data inside them are lost. However, we accept to continue in mind that things like these are mostly washed for images that are JPEG format because the Histogram that is inside Lightroom doesn't procedure RAW information and rather, works with JPEG information.
This ways that if y'all are shooting and the final photos come up out as JPEG images, then it means that the data inside the image cannot be recovered and hence, if they are blown out, they cannot exist resolved. As a effect, nosotros would recommend shooting in RAW, which will give united states a chance to bring back the data that are lost and hence, we still might be able to work and recover the image.
Please do keep in mind that Histogram cannot give us an accurate representation of the RAW image and hence, it is hard to wait and work on the recovery of the image if you expect at the histogram. Nonetheless, you can definitely see if in that location is any change by moving the sliders around.
Footstep Number 1- Recovering the Highlights
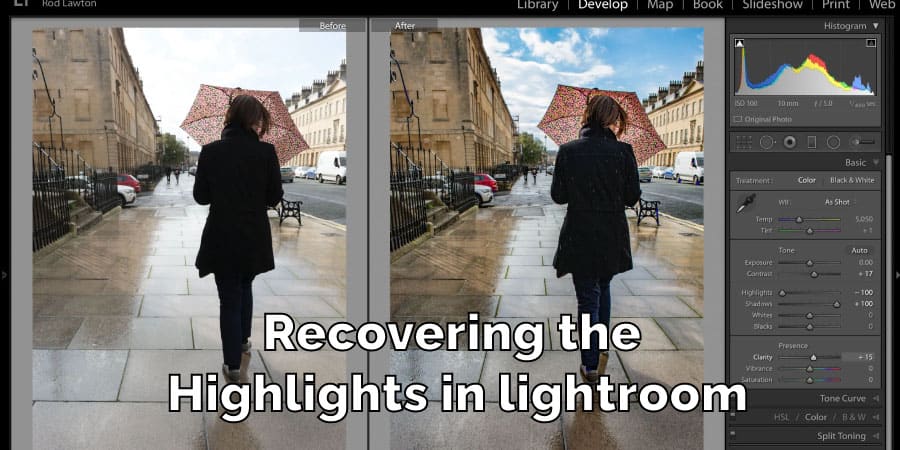
In our production desk, most of us start the recovery process by using the Highlighter Slider. We normally drag the slider until it reaches -100. This slider affects and works on only the bright side of the paradigm and it won't bear upon the mid-tones, shadows, and pure whites, which will brand sure that the paradigm doesn't break downwards completely.
A reason why people use the Highlights Slider as the nearly important and effective tool for recovering the blown-out photos is that the tool has special algorithm that works well for recovering the image. For example, if for some reason, one of the 3 color channels (cherry, blue, and green) lacks information considering of overexposure, this algorithm will effort to rebuild it based on the other two channels. As a upshot, you tin say that this algorithm tin make something from zilch!
Afterward that, we try to evaluate if the adjustments made on the Highlights slider can recover the overexposed areas. If we come across that it didn't work, then we have to go to the next recovery pick.
Step Number 2- Adjusting the Whites of the Prototype
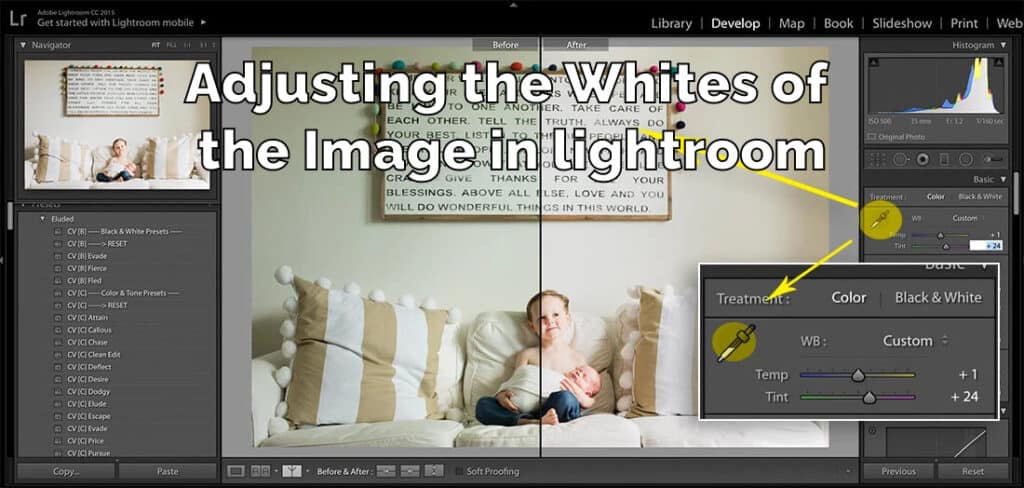
Equally the name suggests, the Whites Slider more often than not affects the areas that are the brightest in the prototype. It can even work on pure whites. However, there is no mechanism within information technology that can rebuild the color data. This slider is generally used for setting the white betoken in an image that will requite it a wide tonal range of colors.
Every bit a rule of thumb, we unremarkably slide the whole bar to the left of this slider until it reaches the value of -100 and so we see if that has fixed the overexposure of the image. Withal, if information technology doesn't work on that too, and then we will again go to the next role of the recovery.
Footstep Number 3- Balancing the Exposure of the Image
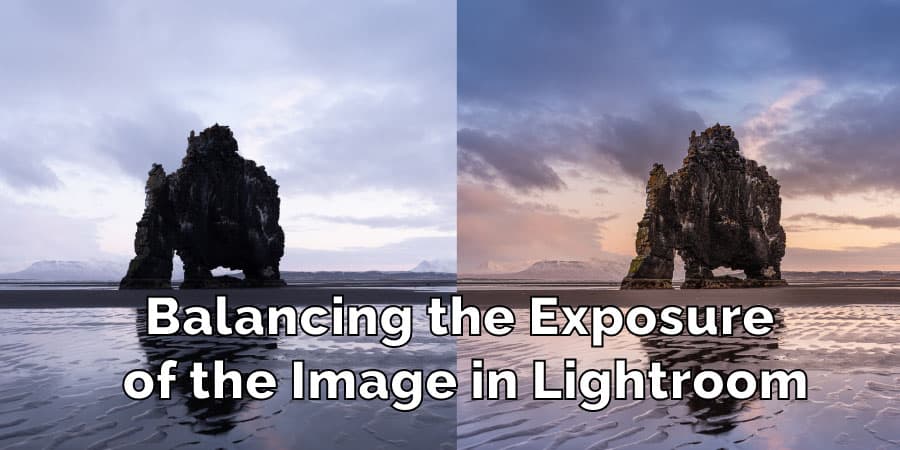
This Slider generally affects the overall brightness and the exposure of the image that tries to follow the similar effect of the camera's exposure, for example, the aperture, shutter speed, and ISO of the camera. If nosotros requite y'all an instance, suppose yous accept taken two photos that has the same scene where one of them is properly exposed and on the hand, the other one is underexposed, only just by only i stop.
Then if we bring both of these ii images to Lightroom and then boost the Exposure of the prototype that is underexposed by one stop, this will create ii identical images that looks like in exposure.In this final step, we click on the Exposure Slider and and so start to slowly move it to the left, which will ultimately make the image darker.
Nonetheless, even after making the image darker, if you see that the white part of the image is notwithstanding blown out, that will definitely hateful that the image cannot be recovered any further. According to the experience that we have gathered hither so far, if the image is overexposed past one end, then the Highlighter Slider will be able to recover the brightest areas.
You will be able to balance the overall brightness of the photo afterward using this Slider. On the other hand, if the image has been overexposed past more 1.five to two stops, then we volition need to work on all three tools to make it work. The final event so won't ever be anticipated because you will simply have to try and decide if the recovery of the image is possible or not through them.
FAQ
Tin y'all fix overexposed Polaroid's?
Yeah! You lot can definitely fix overexposed Polaroid's with the help of Adobe Lightroom. However, delight do keep in mind that if the pictures have become also white or light, and so there won't be whatsoever information inside the images for the software to read. As a outcome, it will then exist non possible to set up and properly expose the images.
How exercise you gear up overexposed whites?
The Whites Slider more often than not affects the areas that are the brightest in the prototype. It can fifty-fifty piece of work on pure whites. Even so, at that place is no mechanism within it that tin can rebuild the color data. This slider is more often than not used for setting the white bespeak in an prototype that will give it a wide tonal range of colors. As a rule of thumb, nosotros ordinarily slide the whole bar to the left of this slider until it reaches the value of -100 and and so we run into if that has fixed the overexposure of the image.
How do yous fix sun in pictures?
The sun light that comes through an paradigm by and large comes from overexposure of the epitome and this can exist balanced through different exposure tools that tin can be establish in Adobe Lightroom. Amid them, nosotros can use the Exposure Sliders, White Sliders and the Highlighter Slides. All the same, we accept to go along in mind that if the photo is a lot overexposed, and so it volition be difficult for united states of america to regain the lost information that is inside the image.
Conclusions
The all-time and the most efficient way to avoid getting photos that are overexposed is to learn the usage of Histogram that is already in that location in your camera. If we learn that, this will definitely help us get the right exposure all the fourth dimension. However, if y'all all the same come nether a state of affairs that will make you employ the software, we hope this article will assist yous guide through the journey on how to set up an overexposed photograph in Lightroom.
We hope you liked our article and do let us know if you have whatsoever questions in the comments section. Likewise, do look at the previous articles that we take published and hopefully, you will like them also.
Read Likewise: How to Hang a Picture on a Curved Wall

How To Fix Overexposed Photos In Lightroom,
Source: https://clickthephoto.com/how-to-fix-an-overexposed-photo-in-lightroom
Posted by: pugliesesieneat.blogspot.com
0 Response to "How To Fix Overexposed Photos In Lightroom"
Post a Comment